- Category
- Practical craft lessons
- Reading time
- 7 min.
- Sources
- Source-based lesson with original teaching diagrams
Start with the cloth, not a parts list
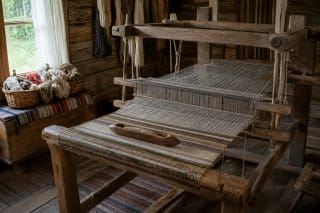
It is easy to memorise loom parts without understanding how cloth forms. This lesson links each component to an action. Gather paper, several threads and a photograph or museum demonstration showing a loom at work. In a workshop, move equipment only with the demonstrator: the threaded system may be tensioned and ready for use.
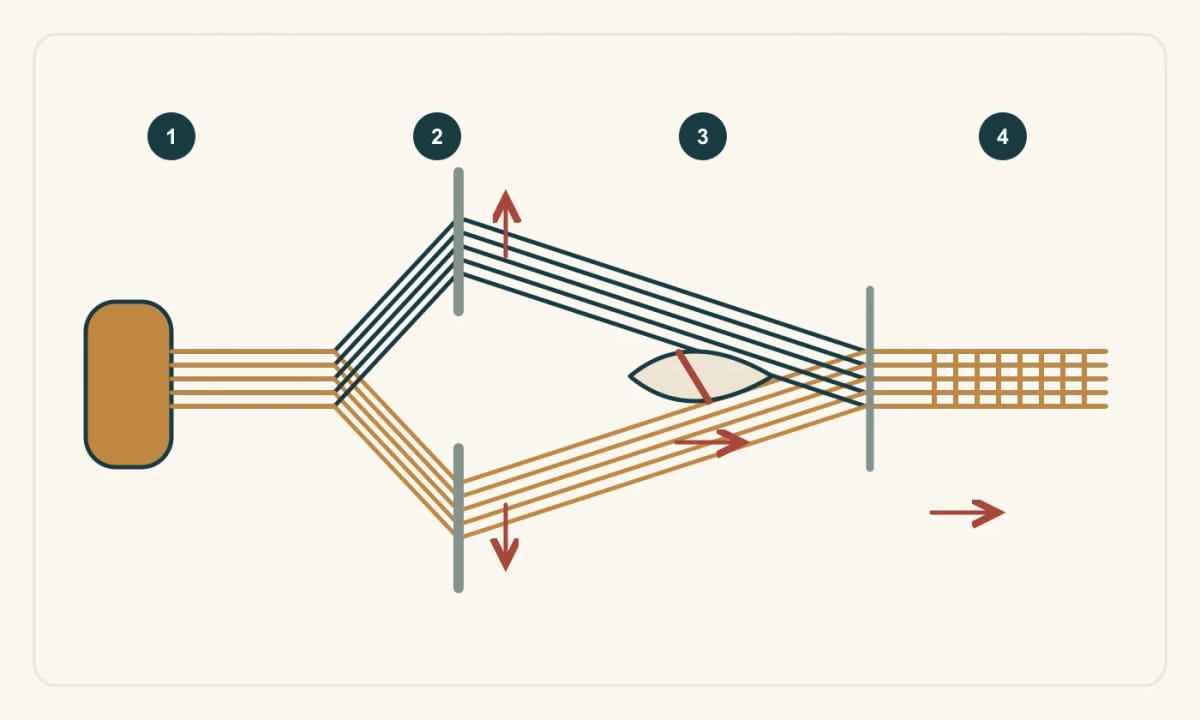
Our illustration is a simplified functional diagram, not a drawing of a particular museum loom. Beam, treadle and heddle arrangements vary. It separates four zones: held warp, warp division, weft insertion and formed cloth. Locate these functions in your photograph even if the physical parts are arranged differently from the illustration.
In the diagram, 1 marks warp holding, 2 separation, 3 weft insertion through the shed and 4 emerging cloth. Colours distinguish functional yarn groups; actual weaving does not require differently coloured yarns.
Warp: the held direction
Warp is the yarn system held lengthwise under tension. In the photograph, follow one end from the unwoven area into the cloth. Mark where the yarns remain separate and where they interlace with weft. That boundary is a better orientation guide than the outline of the wooden frame, especially in an unfamiliar camera angle.
For a table model, lay several threads parallel and lightly tape their ends. Tension should only keep them orderly. Uneven threads immediately show why preparation matters: it is difficult to cross a clear row when some ends sag or overlap. This is an observation model, not an instruction for preparing a real warp.
Heddles and shed: make an opening
Heddles help separate warp groups. The shed is the opening between those groups through which weft can pass; it is not a separate wooden component. Two thread paths in the diagram show separation, while the space between them is the passage. Check your understanding: if every warp end rose equally, would this division and opening appear?
Gently lift alternate threads in your model and look from the side. You can now see the principle implemented by a loom’s control system. Do not infer that a particular treadle always raises only one shaft. Connections depend on the equipment and setup and must be checked in the actual demonstration.
Weft, shuttle and reed
Weft crosses the warp. A shuttle carries it but does not remain in the fabric. Point separately to yarn and carrier in the photograph; this prevents a common confusion. The reed spaces the warp and, working with the beater, helps bring weft against the cloth. Its role differs from the heddles’ separation of the warp.
Pass a contrasting thread through the opening in your model. Release the raised group, change the thread positions and make the next pass in the opposite direction. A few clear crossings are enough. Pulling the horizontal thread hard narrows the model; record this as an observed tension effect, not a rule explaining every real selvedge problem.
Explain one working cycle
Cover the component names and explain what allows another row of cloth to form: separate warp, insert weft, bring it into place and prepare the next separation. Exact movement combinations and timing depend on the loom. This chain helps you follow a demonstration but does not replace the maker’s operating instructions.
Finish by drawing the yarn path and assigning a verb to each component: holds, separates, carries, brings together. Mark an unseen part as “not shown” rather than inventing it. Use the LTFai glossary to check terms and the ARS resource to compare loom and shuttle examples. You have succeeded when your explanation still works for a differently shaped loom.