- Category
- Practical craft lessons
- Reading time
- 7 min.
- Sources
- Source-based lesson with original teaching diagrams
Set up a two-sided examination
Allow about half an hour. Gather a clean, pale fabric scrap, a magnifier or phone macro view, white paper and paper strips in two colours. Use your own fabric that can be turned over; do not touch or dismantle a museum textile. Photograph the whole sample and then the same small area on each side. A paper marker beside it will help you keep track of the edges.
Keep separate spaces for observation, hypothesis and verification. “I see diagonal lines” is an observation; “possibly twill” is a hypothesis. Stripes, checks, red yarn or linen fibre alone do not identify a weave. The goal is to follow the path of a thread, rather than assign a region, date or maker from a photograph.
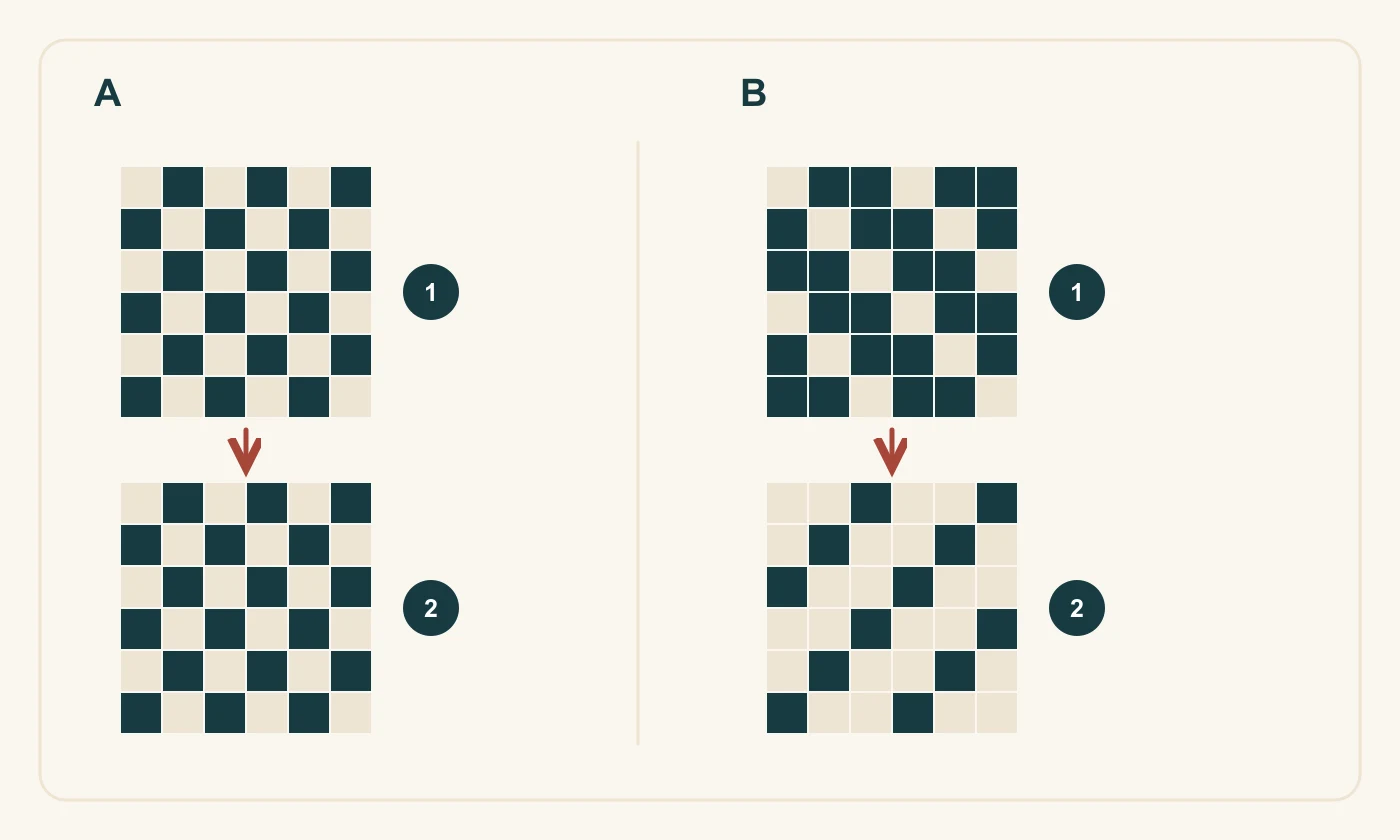
In the diagram, A is plain weave and B is 2/1 twill; 1 marks the chosen face and 2 the reverse after turning about a vertical axis. Dark squares show the vertical yarn system on top and pale squares the horizontal one. Grid proportions do not represent actual yarn density.
Find the thread directions first
Woven cloth contains intersecting warp and weft systems. When a true woven selvedge survives, warp runs parallel to it; a cut edge gives no such guide. If you cannot establish the directions, temporarily call them A and B. Your record then remains accurate despite missing information. Do not confuse one yarn with the individual plies twisted together to make it.
Choose one clear yarn and visually follow several crossings. Record where it lies above another and where it passes beneath. Repeat for its neighbour. Do not probe a fragile textile with a needle or try to lift an old thread: magnification and light from different angles are more useful for this exercise than physical manipulation.
Plain weave: alternating single crossings
In the original diagram, a dark square means the vertical yarn lies above the horizontal yarn; a pale square means the reverse. The plain-weave model alternates over–under–over–under, and the next row starts the opposite way. Make the model with paper strips and mark one corner. Turn it over: crossing positions reverse while the overall small-scale rhythm remains similar.
This does not mean both sides of every plain-woven textile look identical. Different yarns, dyeing, printing, finishing and wear may distinguish them. Write two conclusions: the crossing sequence you established and the surface differences you observed. Structure and subsequent appearance answer different questions.
Twill: follow the shift
In the second teaching grid, a vertical yarn repeatedly passes over two horizontal yarns and under one, with the sequence shifted in successive rows. The shifts create a diagonal direction. This is a simple model of 2/1 twill. Its reverse exchanges upper and lower crossings; retain your corner marker when turning the sample so you can also account for the mirrored view.
Locate several neighbouring repeats. A single diagonal mark is insufficient: a printed design can also run diagonally. Add a question that a better photograph could resolve. For example, does an apparent long float consist of one yarn, or several adjacent yarns of the same colour?
When one grid is not enough
The KTU dissertation distinguishes the ground of overshot fabrics from supplementary pattern weft, and discusses alternating warp- and weft-dominant areas in damask. Not every decorative textile fits a single elementary grid. If you notice an additional yarn system, record it separately rather than forcing the sample into either beginner model.
Finish with a short record: sample origin, sides examined, identified direction, repeating crossing sequence and remaining uncertainty. “Weave unidentified because individual yarns are not visible” is a valid result. You have succeeded if you can show which observations support your conclusion and identify the additional view needed to check it.