- Category
- Practical craft lessons
- Reading time
- 7 min.
- Sources
- Source-based lesson with original teaching diagrams
What this diagram actually shows
This lesson uses an original, elementary plain-weave crossing grid. It is not copied from a historic textile and has no traditional motif name. It shows which yarn is on top at each intersection. It does not specify provenance, yarn thickness, sett, loom type or finished dimensions. Record these limitations before beginning.
Gather squared paper, a pencil, paper strips in two colours and a little tape to hold the start. Work on a table; a loom is unnecessary for this reading exercise. The strips are enlarged thread models, so their stiffness and gaps do not predict real fabric properties. We are checking crossing logic, not the quality of finished cloth.
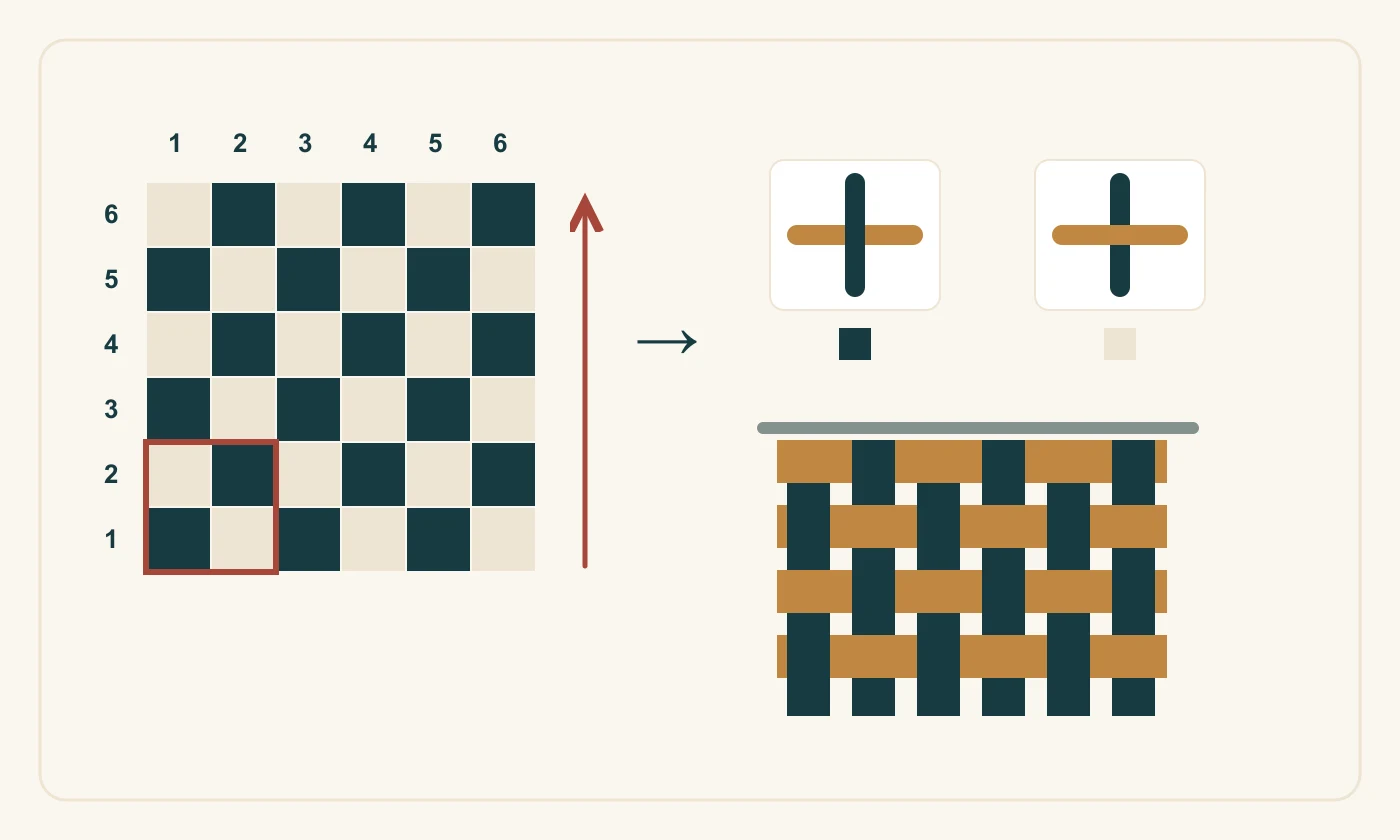
The left-hand diagram contains the numbered grid, with the smallest repeat outlined in red. At upper right, crossings explain dark and pale squares; below is the paper-strip model. The arrow beside the rows indicates the chosen reading direction.
Read the legend before the squares
Here vertical columns represent warp ends and horizontal rows represent weft insertions. A dark square means warp over weft; a pale square means weft over warp. Read rows upwards from the bottom and columns from left to right. This is the convention chosen for this lesson; always check symbols and starting direction again in another publication.
Draw six columns and six rows. Shade the first, third and fifth squares in the bottom row, then the second, fourth and sixth in the next. Repeat those two rows. Mark the starting corner outside the grid so the marker is not confused with another crossing symbol. A black square does not mean black yarn.
Turn a row into a paper model
Lay six strips of one colour parallel and temporarily secure their upper ends. These are the model warp. Pass the first horizontal strip of the other colour under the first vertical strip, over the second, and continue alternating. Why begin underneath? The first dark square requires the warp, rather than the incoming weft, to be on top.
Insert the next horizontal strip with the opposite crossing sequence. After every row, stop and compare each crossing with the grid. Do not add another row before checking: a clear connection between square and yarn matters more than speed. Gently bring the strips together without crushing them or hiding incorrect crossings beneath folds.
Find the repeat and a deliberate error
The smallest repeating block in this model spans two columns and two rows. Outline it and mentally extend it in both directions. Then change one square in a separate grid and point to the paper crossing that must change. This small experiment shows that a symbol governs a specific crossing, rather than vaguely changing “the whole pattern”.
Common reading errors include restarting on the wrong row and confusing “warp on top” with “weft on top”. Mark the last verified row on a separate record. If the whole model appears reversed, first check the legend and the side you are viewing before deciding that the draft itself is wrong.
What a working loom draft still needs
A working loom draft also needs threading through the heddles, shedding control and the weft sequence. Treadle tie-up depends on loom mechanics; a crossing grid is not a universal treadling instruction. The glossary terms threading draft and tie-up distinguish these components. The KTU textile study likewise separates fabric structure from ornamental appearance.
Finish by explaining one chosen square and the entire first row in your own words. Keep the legend with your model; without it the drawing loses information. If you intend to weave yarn, the next step is an instruction verified for your equipment and a small woven sample. This paper exercise does not replace that test.